How To Create Filterable Gallery In Elementor Free
Here in this blog, you will gonna learn how to create a filterable gallery in the elementor free version, just using some free plugins which are available on Wordpress.

How To Create Filterable Gallery In Elementor Free
If you want to showcase your portfolio images in a proper place on your website with filterable options and want to do something more attractive then you have come here to the right place. Here in this blog, you will gonna learn how to create a filterable gallery in the elementor free version, just using some free plugins which are available on Wordpress.
Here I used the elementor free version but if you don’t have elementor pro you can download it from here: https://dcreato.com/go/elementor So, we will learn the full process with a few steps so let’s begin:
- Install the plugin
- Place the widget
- Customize the filterable option
- Bottom line
STEP-1 INSTALL THE PLUGIN
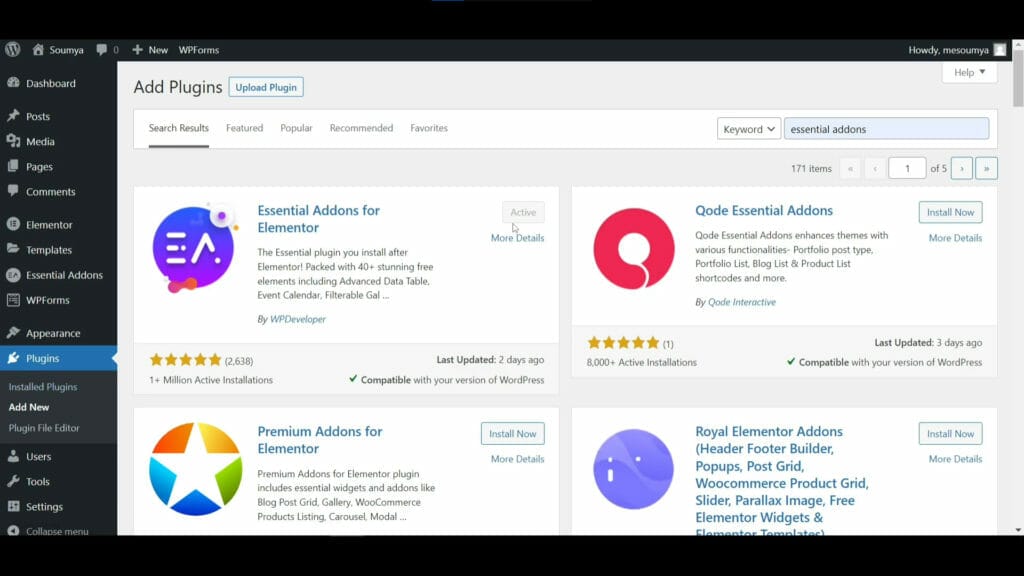
At first, we need a free plugin to make the filterable gallery called Essential Addons For Elementor. This is the most popular plugin to get premade sections and blocks and also a lot of widgets. So, search the plugin on the search bar and install and activate the plugin. Here I already installed the plugin so that's why now I'm activating the plugin.
STEP-2 PLACE THE WIDGET

After installing the essential addons plugin we have to place the filterable widget. Before placing the widget we have to select the column and here I select 3 columns and give 10% width to make proper alignment in the center. Then search on the widget search bar and drag and drop this on the column, like here I've placed in the middle column.
STEP-3 CUSTOMIZE THE FILTERABLE OPTION

After placing the filterable widget you will see this type of interface. Now you have to customize it to make a proper filterable gallery. First I'm giving some spacing to the top because the widget is sticked with the top. Here I'm giving 50px padding to the top.

If you wanna keep a lot of pictures then you can switch on the load more button. Also, you can increase the number of pictures that you want to show on one page. Here I keep the 6 images as default.
![]()
After hovering on the images you will see two icons showing so, you can change the icon under settings, which is the lightbox icon. Here you can change also the animation style like from the default here is a selected slide up animation, from there you can change it.

Now the important thing you have to do is, under filterable control options here is showing the tabs. Here you have to write the tab name here I select 3 tabs. These are the name that we have to put on the gallery items control name, then the tab will work properly.

After doing some important changes we have to customize it to look good. That's why here I'm changing the typography fonts, colors, border-radius etc.

We are almost done. Just go to the gallery item and give the name and target the control name and change the image. Make sure to give the correct and exact tab name as the control name in the gallery item, otherwise, it will not work. Now you have successfully created the filterable image gallery.
BOTTOM LINE
So, here is the process of how you can create a filterable image gallery in the elementor free version. The most important thing is that WE MADE A VIDEO ON HOW TO CREATE FILTERABLE GALLERY IN ELEMENTOR FREE, here’s the link, you can watch this you will better understand: https://youtu.be/yDn6jt6CH3A
That’s all there is to it! We hope that you’ve learned something new today and that you’ll be able to apply it to your own website. If you like it then share this post and if you have any questions or feedback on this blog, please leave them in the comments, or you can comment on youtube, we will reply to you shortly!
About Author

Hameed Aslam
Hameed Aslam is a website design and development expert, as well as an SEO and content strategist. He is the founder of DCreato and many other online ventures. Hameed's skills with web design, development, SEO, and content marketing have helped him achieve success in online business. He loves to help others learn about these topics so that they can also be successful online.
.jpg)


Latest Comments 0 Responses