How To Add Language Translator On Wordpress Website
If you want to add a language translator to your Wordpress website then you come here to the right place because here in this blog you will learn how to add a language translator to a WordPress website.
How To Add Language Translator On Wordpress Website
If you want to add a language translator to your Wordpress website then you come here to the right place because here in this blog you will learn how to add a language translator to a WordPress website. Here I'll not use any paid plugins or any single line of code, here is used only free plugins which is available or Wordpress. So, we'll gonna learn this process with a few steps so let's begin:
- Install the plugin
- Customize the plugin
- Save Changes
- Bottom line
STEP-1 Install the plugin

First, you have to install one plugin called "Google language translator", after you search the plugin you will see the first plugin. So you have to install it and click on activate.
STEP-2 CUSTOMIZE THE PLUGIN

After activating the plugin, when you hover on settings you will see the plugin settings below there. Now click on it to do changes and active the translator.
Now you have full control to manage it. First of all, you will see the activation switch, it will by default be activated so, you don't have to do anything. After that, you have to select what languages will be activated on your google translator, let's say here I select all languages, if you wanna select any specific language then select them one by one and save the changes. Also here you can change the color and also can deactivate the flags icon or only languages, you can change the position where you want to keep it on your website page, you can deactivate google branding, you can change layout settings like vertical or horizontal, and finally after making all of the changes you have to save the settings must.
STEP-3 SAVE CHANGES

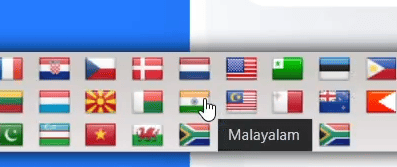
Here I select all of the languages and make it to light blue color and keep the position in the bottom right so, after I clicked on the translate button, as you can see that the all of languages are shown up and from the list, I can select any of languages by clicking on the flag.
![]()
Now, you may think that how can I know which country and which language? if you hover on any flag, it will show you the languages, that's how you can recognize and select your language as you want. Also, you can select from the top of the bar of the website, like the images shown here. So, that's the full process of how you can add language translators to your Wordpress website.
BOTTOM LINE
So, in this blog, you have learned how to add language translators to your Wordpress website.
That’s all there is to it! We hope that you’ve learned something new today and that you’ll be able to apply it to your own website.
If you like it then share this post and if you have any questions or feedback on this blog, please leave them in the comments, we will reply to you shortly!
About Author

Hameed Aslam
Hameed Aslam is a website design and development expert, as well as an SEO and content strategist. He is the founder of DCreato and many other online ventures. Hameed's skills with web design, development, SEO, and content marketing have helped him achieve success in online business. He loves to help others learn about these topics so that they can also be successful online.
-
 4 years ago
 -

-

-
 4 years ago


Latest Comments 0 Responses